Wheel nuts and wheel bolts are crucial components of your vehicle's wheel assembly. These small but mighty fasteners play a vital role in keeping your wheels securely attached to your vehicle, ensuring your safety on the road. In this comprehensive guide, we'll delve into the world of wheel nuts and bolts, exploring their types, proper installation techniques, and essential maintenance tips to keep your vehicle running smoothly and safely.
Understanding Wheel Nuts and Bolts
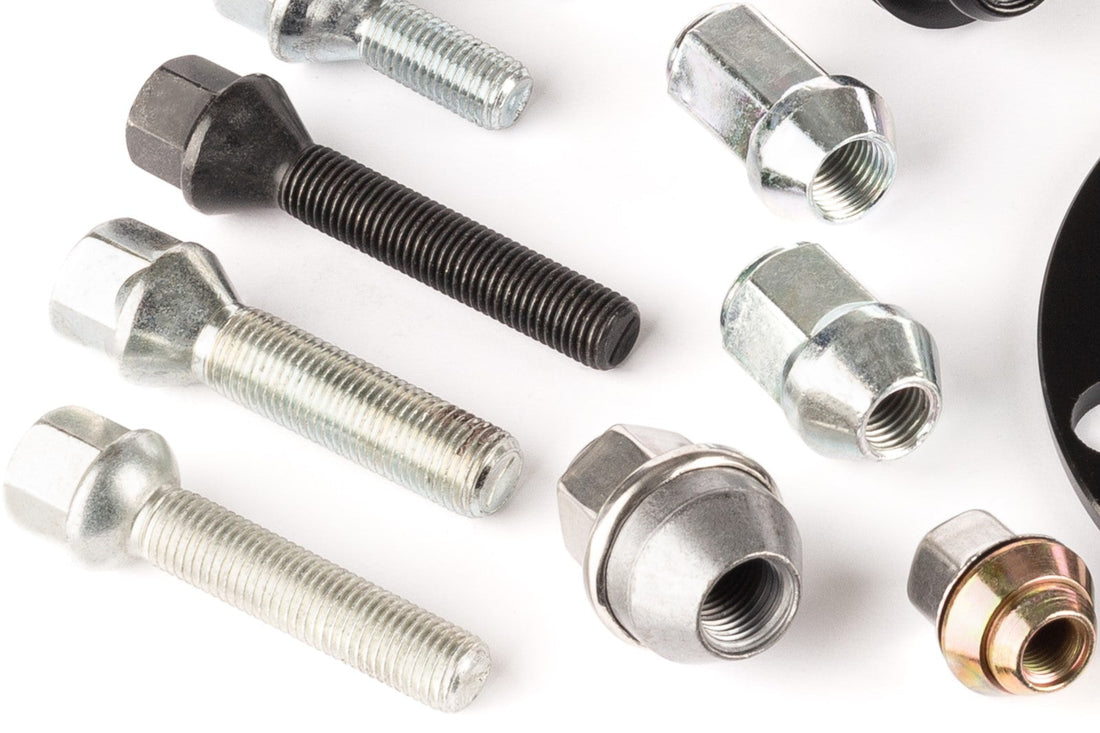
What Are Wheel Nuts and Bolts?
Wheel nuts and bolts are fasteners used to secure wheels to a vehicle's hub or brake rotor. While they serve the same purpose, there's a key difference between the two:
- Wheel nuts: These are used in conjunction with wheel studs, which are permanently attached to the hub or brake rotor. The wheel is placed over the studs, and the nuts are then threaded onto the studs to secure the wheel.
- Wheel bolts: These are used in systems where there are no studs. Instead, the bolts thread directly into threaded holes in the hub or brake rotor, passing through holes in the wheel to secure it.
The Importance of Proper Wheel Fastening
Correctly installed and maintained wheel nuts or bolts are critical for several reasons:
- Safety: They keep your wheels securely attached to your vehicle, preventing potentially catastrophic wheel separation incidents.
- Performance: Properly fastened wheels ensure optimal vehicle handling and reduce vibration.
- Longevity: Correct installation and maintenance of wheel nuts or bolts can extend the life of your wheels, hubs, and other related components.
Types of Wheel Nuts and Bolts
Wheel Nut/Bolt Variations
Wheel nuts and bolts come in several variations:
- Standard Hex: The most common type, featuring a hexagonal shape for easy tightening with a standard lug wrench. Most commonly either 17mm, 19mm or 21mm.
- Tuner Nuts/Bolts: These most commonly utilise a star shaped key that is inserted into the top of the nut or bolt, which can then be fastened. Less common Tuner Nuts or Bolts feature a splined section and a socket that goes over the nut or bolt in order to fasten, rather than being internally fastened like in the first example. These are used on specific wheels ONLY, where a regular nut or bolt would prove too wide for the lug hole diameter.
- Locking Nuts/Bolts: These include a unique locking pattern that corresponds to a key, providing additional security against wheel theft.
- Extended Thread Bolts: Used for wheels with greater thickness or when spacers are employed.
- Extended Thread Nuts: Use for wheels where too much of the hub stud protrudes through the lug hole. Used in the situation where a regular nut would bottom out before the wheel is fully tightened.
- Variable PCD Nuts/Bolts: Also known as Wobble Nuts/Bolts. These are special nuts/bolts with a variable taper seat that is capable of lateral movement of 1-3mm. Allowing you to fit a wheel with a PCD differential of up to 3mm.
Wheel Nut & Bolt Seat Types
In addition to Wheel nut and bolt variations, you also must know the seat type for your wheels:
- Taper Seat: The most common type. Usually a 60 degree taper, also known as cone seat. Feature a tapered end that matches conical holes in the wheel.
- Radius Seat: Also known as ball seat. These have a rounded end that sits in a matching depression in the wheel. Comes commonly in Radius 12, Radius 13 & Radius 14. The difference in size is the curvature of the radius.
- Flat Seat: These as the name imply feature a flat surface that seats directly to a flat surface on a car wheel. Probably the least popular seat type.
Proper Installation and Tightening Procedures
Tools Required
Before beginning the installation process, ensure you have the following tools:
- Torque wrench
- Socket set
- Vehicle jack and jack stands
- Wheel chocks
- Wire brush or sandpaper
- Anti-seize compound (optional)
- Thread locker (optional)
Step-by-Step Installation Process
- Preparation:
- Engage the parking brake and place wheel chocks on the opposite end of the vehicle from where you're working.
- Loosen the wheel nuts or bolts slightly while the wheel is still on the ground.
- Jack up the vehicle and secure it with jack stands.
- Removal:
- Remove the wheel nuts or bolts completely.
- Carefully remove the wheel from the hub.
- Cleaning and Inspection:
- Clean the hub surface, wheel mounting face, and threads of the studs or bolt holes using a wire brush or sandpaper.
- Inspect for any damage, wear, or corrosion. Replace any damaged components.
- Preparation for Installation:
- If using wheel nuts, apply a small amount of anti-seize compound to the stud threads (unless otherwise specified by the manufacturer).
- For wheel bolts, apply anti-seize to the bolt threads and the area where the bolt head contacts the wheel.
- Wheel Mounting:
- Carefully place the wheel onto the hub, aligning the holes with the studs or bolt holes.
- Hand-tighten the nuts or bolts to ensure proper threading.
- Initial Tightening:
- Using a socket wrench, tighten the nuts or bolts in a star pattern (alternating sides) until they are snug.
- Do not fully tighten at this point.
- Torque Application:
- Lower the vehicle so the wheel is touching the ground but not bearing the full weight of the vehicle.
- Using a torque wrench, tighten the nuts or bolts to the manufacturer's specified torque value.
- Follow a star pattern, moving to opposite sides of the wheel rather than working in a circle.
- Tighten each nut or bolt in several passes, gradually increasing the torque until you reach the specified value.
- Final Check:
- Lower the vehicle completely.
- Perform a final check of each nut or bolt with the torque wrench to ensure they are all tightened to the correct specification.
The Importance of Proper Torque
Applying the correct torque to wheel nuts or bolts is crucial for several reasons:
- Even Pressure: Proper torque ensures even pressure distribution across the wheel, preventing warping or damage.
- Preventing Over-tightening: Excessive torque can stretch studs or bolts, leading to fatigue and potential failure.
- Avoiding Under-tightening: Insufficient torque can allow wheels to work loose, leading to vibration, uneven wear, and potential wheel separation.
- Manufacturer Specifications: Torque values are carefully calculated by vehicle manufacturers to provide optimal safety and performance.
Maintenance and Safety Checks
Regular Inspection Routine
Implement the following routine to ensure your wheel nuts or bolts remain in good condition:
- Visual Inspection:
- Check for any visible signs of corrosion (thorough corrosion affecting the integrity of the nut or bolt. Surface corrosion is normal), damage, or looseness.
- Look for any cracks or deformation in the wheel around the lug holes.
- Torque Check:
- Use a torque wrench to verify that all nuts or bolts are tightened to the correct specification.
- Perform this check at least once a month and before any long trips.
- Retorquing:
- After installing new wheels or after the first 50-100 miles of driving, recheck and re torque the nuts or bolts.
- This is crucial as initial settling can occur, potentially leading to looseness.
- Cleaning:
- Periodically clean the threads of studs or bolt holes to remove any built-up dirt or corrosion.
- This ensures proper seating and makes future removal easier.
Signs of Potential Issues
Be vigilant for the following signs that may indicate problems with your wheel nuts or bolts:
- Vibration: Unusual vibration while driving, especially at higher speeds, can indicate loose or unevenly tightened fasteners.
- Visible Movement: Any visible wobbling or movement of the wheel relative to the hub is a serious issue requiring immediate attention.
- Clicking or Knocking Sounds: These noises, particularly when turning or braking, may indicate loose wheel nuts or bolts.
- Difficulty in Removal: If nuts or bolts are exceptionally hard to remove, this could indicate corrosion or over-tightening.
- Visible Damage: Any cracks, stretching, or deformation of the fasteners or surrounding wheel area require immediate replacement.
Advanced Considerations
Lug Nut or Bolt Replacement
When replacing wheel nuts or bolts, consider the following:
- Material Compatibility: Ensure the replacement fasteners are compatible with your wheel material (steel or alloy).
- Thread Pitch and Size: Match the thread pitch and size exactly to the original fasteners.
- Seat Type: Use the correct seat type (flat, tapered, or ball) to match your wheels.
- Load Rating: Ensure the replacement fasteners meet or exceed the load rating of the originals.
- Corrosion Resistance: Consider using fasteners with enhanced corrosion resistance for improved longevity.
Special Considerations for Alloy Wheels
Alloy wheels require some additional care:
- Torque Specifications: Often, alloy wheels have lower torque specifications than steel wheels. Always follow the manufacturer's recommendations.
- Retorquing Frequency: Alloy wheels may require more frequent retorquing due to their tendency to expand and contract more with temperature changes.
- Use of Torque Sticks: While convenient, torque sticks are less accurate than a calibrated torque wrench. For alloy wheels, always use a proper torque wrench for final tightening.
- Thread Engagement: Ensure proper thread engagement, especially with aftermarket wheels that may have different thicknesses.
Impact of Weather and Environmental Conditions
Different climates and driving conditions can affect your wheel nuts and bolts:
- Cold Climates: In areas with frequent freeze-thaw cycles, use anti-seize compounds to prevent nuts or bolts from seizing due to corrosion.
- Coastal Regions: Salt air can accelerate corrosion. Consider using stainless steel or specially coated fasteners in these areas. You can also use nut or bolt caps/covers that will hide any surface corrosion and greatly improve the look of your wheels.
- Off-Road Use: Vehicles used off-road may require more frequent checks and cleaning of wheel fasteners due to exposure to mud, sand, and debris.
- Extreme Temperatures: Both very hot and very cold temperatures can affect metal expansion and contraction. Be particularly vigilant about checking torque in these conditions.
Understanding and properly maintaining your vehicle's wheel nuts or bolts is crucial for safety, performance, and longevity. You can ensure that these small but critical components are always in optimal condition. Remember to use the correct tools, follow manufacturer specifications, and perform regular checks to keep your wheels securely fastened and your vehicle running smoothly.
Choose RYBO today!
Ready to elevate your vehicle's performance and safety? Look no further than RYBO, your trusted partner in automotive excellence. With our extensive range of high-quality wheel nuts, bolts, and related products, we've got everything you need to keep your wheels secure and your ride smooth. Don't compromise on safety or performance – explore RYBO's wide selection today. Our team of experts is standing by to help you find the perfect solution for your specific vehicle and driving needs. Contact us today!